
Booklets are the best way to get a lot of information across to your customers. From magazines and brochures to employee handbooks, they’re an invaluable tool for any business.
But if the idea of setting up a multi-page document like a booklet for print is a little daunting, you’ve come to the right place. Here we’ll look at how to set your artwork up for stapled, perfect bound and wire bound booklets plus lots of handy set-up and design tips so you get it right first time.
Stapled Booklets
How to set up your artwork
Our most popular booklet printing option, stapled booklets are arguably the easiest book type to set up. Here’s a quick step-by-step guide to getting it right.
- Your artwork must be a single document with individual pages (not spreads)
- Each page should be the finished size of each book, so A5 for an A5 booklet
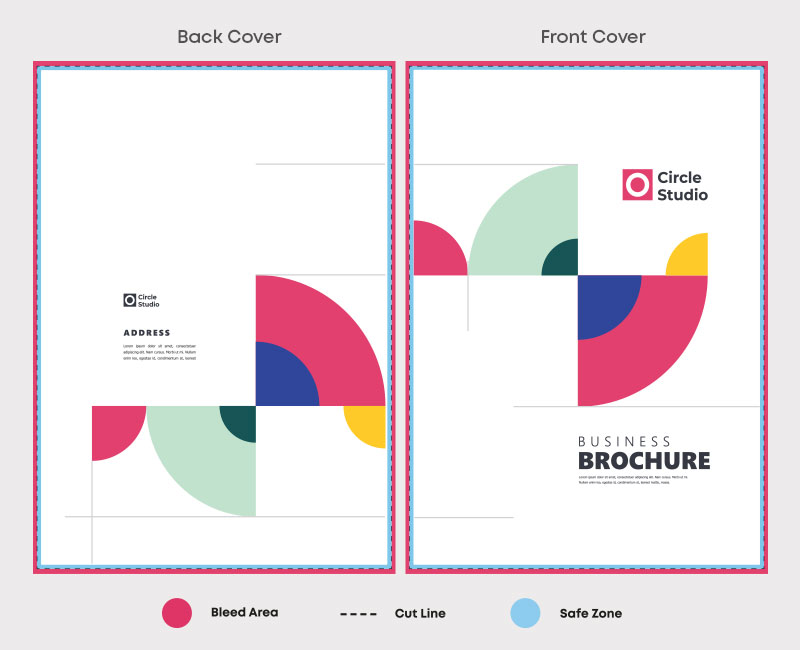
- Add 3mm bleed area and 3mm safety area to each side of your page
- Set your colour mode to CMYK
- Design your pages in reading order, starting from the front cover and ending with the back cover
- Save as a PDF to embed fonts and images with a resolution of at least 300dpi
For a more thorough guide to creating a stapled booklet in a range of popular design programs including InDesign and Word, here’s How to Make a Stapled Booklet.
Adding a spot UV cover
You can now add glossy spot UV to your stapled booklet covers! This is a shiny varnish applied to specific areas, like logos, on your cover design to help them stand out against a matt finish, but you can learn more about what spot UV is here.
To add spot UV to your covers, you’ll need to create a separate document with your front and back pages as single pages.
On this new document, highlight everything that you want to be coated in spot UV in a bright colour like orange. Delete everything else!
Save this file with the same name as your original booklet file but add _spotuv to the end of it so we know what you want us to do with that file.
FAQs
Can I have text running across two pages?
We don’t recommend doing this as the pages may crease on the stapled edge and make text illegible.
Do you have a template for stapled booklets?
Not 100% confident in setting it up yourself? Not a problem. We have free templates available on our stapled booklet product pages – just choose your size on the website and pick up your free blank template here:
How do I send my stapled booklet artwork to instantprint?
Once you’re happy with your design, please place your order for the number of booklets you’d like. Then, email across your artwork to us at artwork@instantprint.co.uk. If you file is over 2GB, you’ll need to use wetransfer.com to email us instead.
Whichever option you go for, make sure to use your web order number from your order confirmation email as the subject line.
Perfect Bound Booklets
How to set up your artwork
As perfect bound booklets are made in two parts, we require you to supply your artwork a little bit differently than you would for other kinds of booklets.
How to create your cover artwork:
- Create your cover as a spread in one document like this:
Don’t worry about designing a spine if you’re using Microsoft Word or a similar program to create your booklet as this can be pretty tricky – just request one from our team when you submit your artwork to us and we’ll set it up for free after you’ve placed your order.
If you’re designing in another program, you can make your own spine (although we’re happy to do this for you – just ask!). We’ve made a spine calculator to help you work out the width of the spine based on how thick the stock you’ve chosen is and how many pages your booklet will hold.
How to create your inside pages
- Set up the inside pages of your booklet as separate pages in a single document
- Each page should be the finished size of each book, so A5 for an A5 booklet
- Add 3mm bleed area and 3mm safety area to each outside edge of the page, add 7mm safety area for the binding edge of the page
- Set your colour mode to CMYK
- Design your inside pages in reading order
- Save as a PDF to embed fonts and images with a resolution of at least 300dpi
For a more thorough approach, including how to set up your artwork in a number of different design programs such as Adobe InDesign and Microsoft Word, see How to Make a Perfect Bound Booklet here.
Adding a spot UV cover
You can add shiny spot UV to certain areas of your perfect bound booklet to cover to draw attention to specific elements, like your logo.
To add spot UV to your covers, you’ll need to create a separate document with your front and back pages as single pages.
On this new document, highlight everything that you want to be coated in spot UV in a bright colour like orange. Delete everything else!
Save this file with the same name as your original booklet file but add _spotuv to the end of it so we know what you want us to do with that file.
FAQs
Why do I need to leave extra room for the safety area at the binding edge?
Imagine opening a book with a spine. As all the pages are glued down to the spine, this makes it tricky to completely see everything on the side that’s glued down. By keeping important text and images 7mm away from the glued edge, this means your customers will be able to read the whole booklet properly.
Do you have a template for perfect bound booklets?
Not 100% confident in setting it up yourself? Not a problem. We have free templates available on our perfect bound booklet product pages – just choose your size on the website and pick up your free blank template here:
If you’d like a cover template, get in touch with our team and we’ll be happy to help.
How do I send my perfect bound booklet artwork to instantprint?
Once you’re happy with your design, please place your order for the number of booklets you’d like. Then, email across your artwork files to us at artwork@instantprint.co.uk. If any of your files are over 2GB in size, you’ll need to use wetransfer.com to email us instead.
Whichever option you go for, make sure to use your web order number from your order confirmation email as the subject line.
Wire Bound Booklets
How to set up your artwork
From manuals to training and presentation tools, the silver coil in wire bound books means you can lay them open and completely flat on a desk. It also means there are a couple of extra things to think about when setting up your design. Here’s everything you need to know.
- Your artwork must be a single document with individual pages (not spreads)
- Each page should be the finished size of each book, so A5 for an A5 booklet
- Add 3mm bleed area and 3mm safety area to each side of your page, with an additional 6mm of safety area for the binding side to allow room for the wire to be thread through
- Set your colour mode to CMYK
- Design your pages in reading order, starting from the front cover and ending with the back cover
- Save as a PDF to embed fonts and images with a resolution of at least 300dpi
For a more thorough guide to creating a stapled booklet in a range of popular design programs including InDesign and Word, here’s How to Make a Wire Bound Booklet.
FAQs
Why do I need to add extra safety area to the binding side?
Just like it says on the tin, wire bound booklet pages are bound together with a wire coil. Adding extra safety area means the wire coil won’t cut off any important information.
Do you have a template for wire bound booklets?
Not 100% confident in setting it up yourself? Not a problem. We have free templates available on our wire bound booklet product pages – just choose your size on the website and pick up your free blank template here:
Please note: you will need to adjust the safety area on the binding side of each page of the template to allow extra room for the wire to be fed through.
How do I send my wire bound booklet artwork to instantprint?
Once you’re happy with your design, please place your order for the number of booklets you’d like. Then, email across your artwork to us at artwork@instantprint.co.uk. If you file is over 2GB, you’ll need to use wetransfer.com to email us instead.
Whichever option you go for, make sure to use your web order number from your order confirmation email as the subject line.
And there you have it! A whistle-stop tour to setting booklet artwork up for print. If you need any more help, don’t hesitate to get in touch with our team today!


