When your print makes its way through our factory, it’ll be printed on one of two types of printer, digital or litho.
If you want to know more about the differences between the two printers, this blog will provide you with everything you need to know!
What is Litho Printing?
To give it its full name, lithographic printing is a traditional printing method. Simply put, lithographic printing works by using an aluminium plate and rollers, which through fast movement, creates high quality printed material through the transfer of ink onto paper.
Lithographic printing is a process that uses a metal plate in which the image areas are created using a greasy substance so that the printer ink will adhere while the non-image areas remain ink-repellent. This process works on the fact that grease and water don’t mix.
This method of lithography printing involves adding the artwork onto an intermediate surface before the final sheet. The process is referred to as ‘offset printing’ as the printing plate does not come in direct contact with the paper.
In our factory, we utilise the litho printing method for larger, long run print jobs. Printing our higher volume orders using a litho printer helps ensure that we can keep the quality consistent no matter how big the job.
How Does Litho Work?
Step 1 - Receiving Your Artwork
The design that you send to our team or upload through our handy online portal is expertly checked over by our dedicated studio team using our rigorous and free 10-point artwork check before being sent to print.
Your design will be sent down to our factory where your artwork will be taken to the first machine in your print’s lithographic journey.
Step 2 - Printing The Plates
Before printing any orders, our litho printers require aluminium plates to be prepared.
Aluminium plates are used during the lithographic printing process and are the medium used to transfer the design onto the paper with ink through a series of rollers inside the printer.
At this stage, the blank aluminium plate is lasered with your artwork, creating a form of stencil for your design, ready to be inserted into the printer and coated with ink.
Each of our lithographic printers have unique plate bending requirements. Our Nela Plate Bender has been custom made for the litho printers that we have in our factory! Using a barcode system, the Nela automatically groups our aluminium plates by job – making the lives of our operators so much easier and also making the printing process faster and smoother.
Step 3 - Setting Up The Printer
When the aluminium plates are ready to be taken to the printer, our skilled team of machine operatives will carefully calibrate the printer, ensuring that all of the cylinders and rollers which will be used during the printing process are clean and set up correctly.
Our litho printers all require different calibration settings to efficiently operate and ensure that there is the correct level of ink required for each job which is why we make it our job to ensure that your print is set up for success from the get go!
In our factory, we use several different lithographic printers including the Heidelberg Speedmaster XL 75 and Heidelberg Speedmaster SX102. The Heidelberg Speedmasters are the kings of litho efficiency. At top capacity, the SX 102 can produce up to 14,000 sheets per hour, now that’s a lot of print.
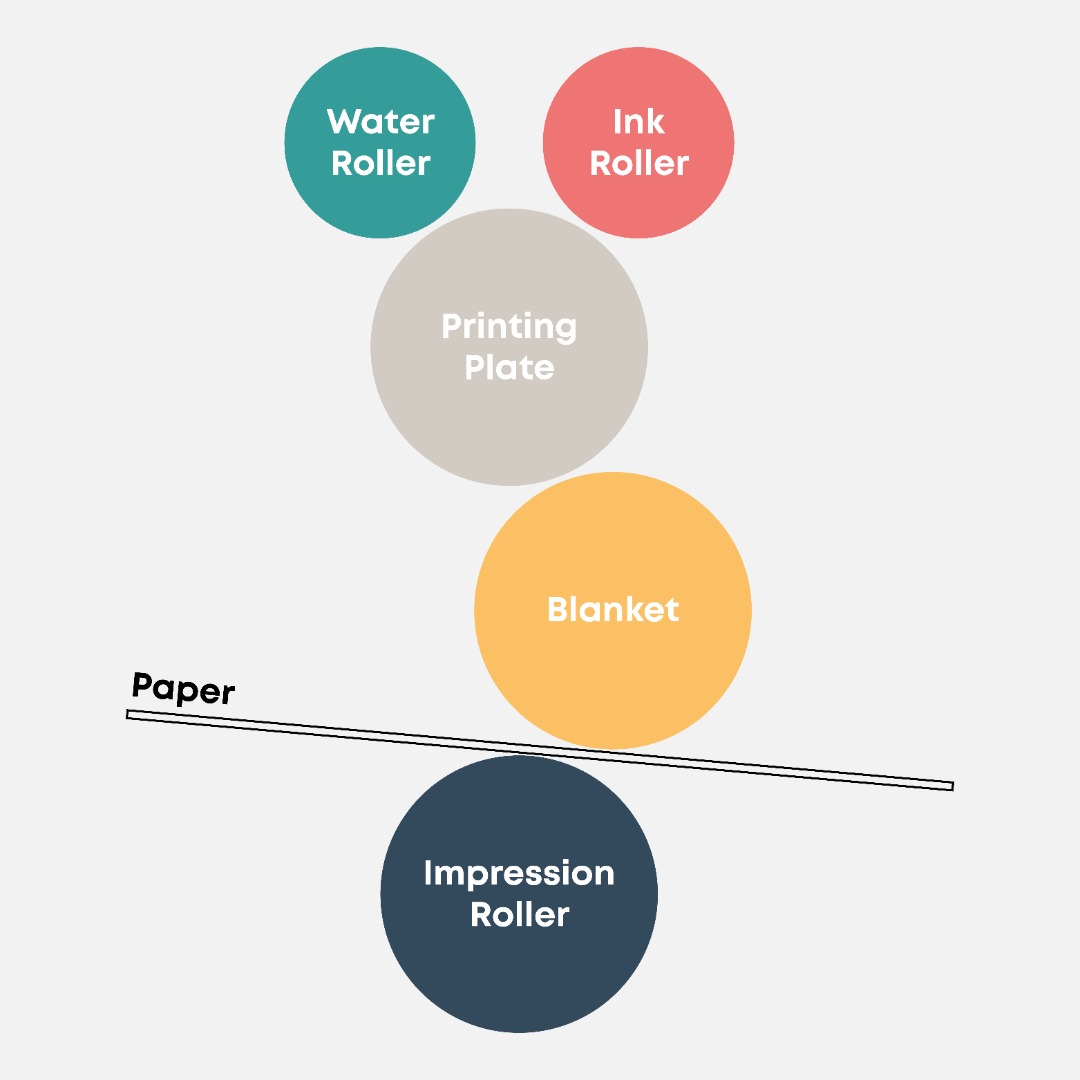
The cylinders and rollers are what lithographic printers use to run the job through the machine. Each cylinder and roller is carefully calibrated to ensure that the job runs smoothly, and the correct amount of pressure and ink is applied within each section.
Step 4 - Setting Up The Ink
After our operator has set up the machine ready to print, the internal cylinders are set rotating and initially, they’re dampened with water, ink and other chemicals.
Each aluminium plate is loaded onto a roller known as the plate cylinder, inside the printer.
Here, every time the cylinder rotates, it dampens the aluminium plate with water in the non-image areas - the parts of your design that have been left blank.
This process is carried out to ensure that ink sticks when required while the non-image areas remain blank and ink-repellent.
The printing surface is kept wet at this stage, so that when the ink-covered roller prints the surface, ink will only stick to the grease-receptive image area.
Step 5 - The Inking Process
Ink is then passed through a series of rollers inside the printer and onto the image area of the plate.
The inking process is done individually by colour in each unit, layers of ink filter through multiple rollers, known as a roller train (due to the number of rollers which can look like wheels under a train), to ensure that the perfect amount of ink is transferred to the plate cylinder within the image area.
Step 6 - Creating The Artwork
The image that has been created from the aluminium sheet using the water and ink is then transferred or ‘offset’ onto another cylinder using a rubber blanket.
The blanket acts like a stamp transferring the artwork between cylinders and on to the paper.
Step 7 - Printing On To Paper
Paper is then loaded into the printer and is separated, ensuring that only one sheet is used at a time.
The paper then travels through the blanket cylinder and a final impression cylinder where the inked artwork is transferred onto the paper. The previous coating ensures that the ink only sticks to the desired areas of the paper and the rest is left blank, forming your artwork.
Step 8 - Finalising Your Print
As your paper makes its way through the printer, one colour is applied at a time.
After the first colour has been applied, the machine will send the paper to the next unit going through the same process as above but with a different coloured ink.
Once all the units have printed the full set of colours, the print is quickly dried with hot air and exits the machine, where the sheets are carefully collated ready to be guillotined and packaged for delivery.
What is Digital Printing?
Digital printing is the process of printing a digital image directly onto the material you’re looking to print on. Unlike lithographic printing which relies on wet ink and printing plates, digital printing uses ink that is printed directly onto the paper, just like an office printer.
Digital printers create your print by copying a digital image from a file and recreating it by dropping minuscule droplets of ink onto the printed material, by rapidly moving across the page.
With no need for plates or grouping up similar types of work, digital printing can be a much faster and cost effective solution, which is why we tend to use our digital printers for smaller quantity jobs.
Technological advancements have helped rapidly improve the quality of digital printing. A big reason we invested in digital printers is because the speed digital printers offer can help us reduce our turnaround times. We can print orders faster and get them to you quicker. At instantprint, we ensure that our factory is filled with only the latest machinery so we can ensure that we keep our print at the highest quality.
Our Digital Printers
Our factory hosts various digital printers including the HP Indigo 10000 Digital Press, which can print up to 2350 sheets per hour.
We also recently invested in the HP Indigo 100K which can print up to 6000 sheets per hour! The perks of this printer allow us to increase productivity with the capability of producing several different jobs back to back.
Thanks to their automated capabilities, such as the ability to change jobs without an operator inputting the new information, digital printers tend to be used for smaller quantity orders. This allows us to ensure that we can manage high amounts of orders, without having to extend our delivery times to manage the workload.
Nanographic Printing
At instantprint, we’re the proud owners of the UK’s first nanographic press the Landa S10P. When we received the Landa, it was the first of its kind in the UK and has revolutionised the way we operate our factory!
This new nanographic technology helps us bridge the gap between digital and litho printing by using sophisticated software to convert digital files into print. Nanographic printing operates much faster than digital and lithographic printing, combining the best parts of each process, taking away the plates required in litho printing, but keeping the speed of interpreting the data from a file to create high quality print with ease.
Digital vs Litho Printing
We use several types of litho and digital printers in our factory, depending on the type of job and the quantities required. With a highly experienced team utilising their expansive knowledge, your print will be sent down the best printing route to keep efficiencies high and waste low. We base decisions based on efficiency, including waste and time so we can remain sustainable.
Both lithographic printing and advancements in digital printing ensure that both these methods are able to produce consistent print quality. We use litho for large-quantity jobs that require large blocks of solid colour whereas we opt for digital for short-quantity jobs that need to be delivered fast.
Neither of these methods is better than the other, but our team will always ensure that your job is sent down the most efficient and effective route to keep quality, consistency and turnarounds as you’d expect.
In Conclusion
Both digital and litho printing have their benefits and are each suited to different types of print jobs, depending on the requirements. Our team's extensive print experience helps us continuously improve our processes maximising the output of each machine we own. Combining this with our commitment to investing in state of the art printing machinery, we’re dedicated to ensuring that you receive quality and consistent print every single time you place an order with us.
.jpg)