Updated 25/03/2026
Clear stickers are a fantastic way to label products with your branding and showcase what’s inside. Whether you’re a jam maker or brewery company, these transparent labels work particularly well with glass containers and can be printed with full-colour text, logos and images. Want to add transparent labels to your branding collateral? Here’s exactly how to make and print transparent stickers online.
How Can You Use Clear Stickers?
Before you start designing and choosing what size and shape stickers you’d like to print, it’s important to consider what you’re going to be using the transparent labels for. Here are some of the most popular clear sticker examples to help give you some inspiration.
1. Jar and bottle labels
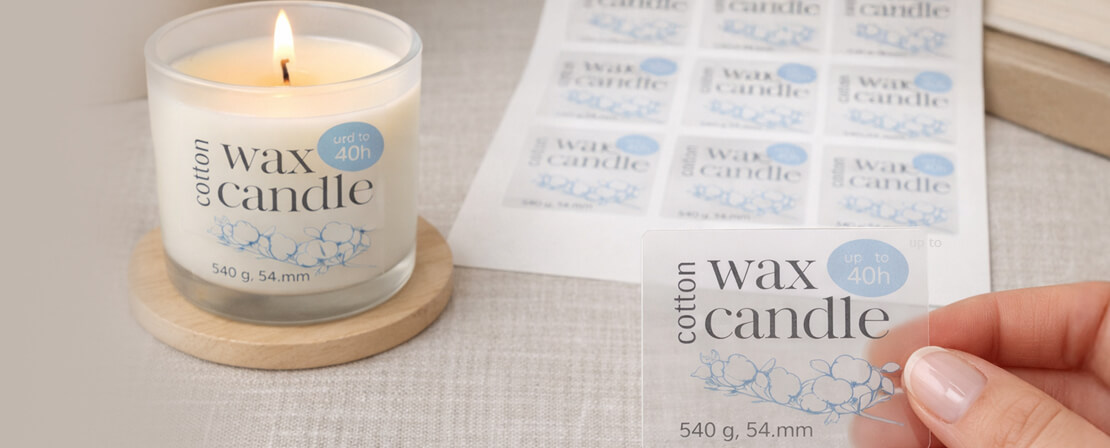
From adding the product name and your logo to an ingredients list on the back, clear stickers are the best option for glass jars and bottles because you can still see the product through them. These kinds of stickers are particularly popular for wine and beer bottles, incense stick and candle jars, jam jars, glass toiletry containers, and other products sold in glass or plastic bottles.
2. Clothing/size tags
Adding a clear sticker to a clothing tag is an excellent way to differentiate your design or tweak your clothing tag to show the item’s size or unique selling point. For example, on products made from a particular material, such as cashmere, a see-through sticker can help customers identify the material without taking away from the garment’s design.
3. Car window stickers
Clear stickers don’t just work on glass jars – they’re effective on all clear surfaces, including windows. Branded car window stickers mean you can literally advertise your business while you’re driving. Or, if you’re looking to enhance your shop’s window display, adding a few tastefully placed A6 or A7 size transparent sales stickers is a quick and easy way to do that.
4. Brand takeaway products
No need to break your budget on branded cups and bags – all you need is a reel of clear labels to keep your brand at the forefront of customers’ minds. Round clear stickers look great on takeaway drink cups, whereas square labels are great for sealing salad tubs and letting buyers know your product is vegan or gluten free.
5. Seal envelopes
Add a special touch to greetings cards when you seal them with branded stickers. Not only does this allow you to add branding at every touchpoint with the customer, but it also adds an extra element of excitement for the recipient. This idea is also great for wedding invitations as you can add the bride and groom’s initials to the sticker for added personalisation.
6. Home organisation labels
One of the biggest trends over on #CleanTok has to be storage and pantry labels – and clear stickers are the secret to creating a seamless look. If you sell prints online, why not add home organisation stickers to your repertoire? You could even go one step further with toiletries and makeup organiser labels!
7. Laptop stickers
The classic branded handout – with a new transparent look. Clever laptop sticker designs will always go down a treat, but you could also use them to add your logo to company laptops, meaning your brand is promoted wherever your team is working from, whether it’s a café or visiting clients.
How to Make Transparent Stickers
1. Set up your artwork
Setting up your artwork for sticker printing should be the first thing you do before starting your design. This will make it easier to save your file and send it straight to print. And it’s easier than you might think!
Setting up square and rectangle stickers
Stickers with straight edges – like our square and rectangle ranges – are super simple to set up for printing. All you need to do is:
- Set your document* to the sticker size you want to print and add 3mm on each side for bleed
- Change the colour mode to CMYK for a better idea of how your colours will print
- Save it out with a resolution of at least 600dpi
- Save your document as a PDF or JPEG to flatten fonts and images
*Most design tools let you set the size up automatically before you start designing. If you’re using Microsoft Office programs, just go to Layout > Size to customise the page size.
Setting up circle stickers
The easiest way to set up circle sticker artwork is to actually set it up as a square. For example, a 30mm circle should be set up as a 30mm x 30mm square – you don’t even need to add bleed as the square’s corners will be used for that.
Then follow the same instructions for square and rectangle stickers.
Using templates
If you’d rather we set your canvas up to the right size and specs for you, that’s not a problem! Simply choose your sticker size and shape and click on the type of template you’d like to use – we have free PDF, Photoshop, Illustrator and InDesign templates to choose from.
2. Check your proof
When you upload your artwork, you’ll be shown a proof – this is what the final design looks like. The green line on your proof shows where the sticker will be cut, so make sure any important information is well within that line.
The dotted red line shows the bleed area – if you’re leaving your background blank, just leave this area blank. However, if you’re planning on printing a background, make sure to extend it to fill this area to ensure your design goes all the way to the edge of your stickers.
Our team manually checks every piece of artwork to make sure it’s set up correctly. However, we can’t check spelling, grammar and key dates for you. Make sure any brand-specific works like your business name and address are correct as well as other possible spelling mistakes before approving your proof for print.
When you’re happy, tick to say you approve and place your order – we’ll check your design and send it straight to print!
Clear Sticker & Label Design Tips
If you’ve never designed transparent stickers before, here are a few different ways to get creative with your design!
Play with the space
Create peekaboo moments with your sticker prints and have your product make up part of the design. For example, if you’re selling strawberry jam, leave heart-shaped spaces in your sticker design blank so that the jam peeking through makes them look red.
Keep text legible
Sticker sizes can get pretty small, so it’s important that you use a large enough font to keep any text legible. We recommend keeping font size above 7pt for all stickers and focusing on logo and image-based designs for the smallest sizes. To check text legibility, zoom out of your design to view your sticker at a distance.
Use your brand colours
Using your brand’s colours ensures your product is unmistakably yours! Building brand recognition through your products means you’re more likely to be remembered and therefore see repeat purchases.
Ready to start designing your own transparent stickers? Pick your shape and size here to access free templates for an easy way to set up your design for print.


